Sunday, February 10, 2013

Mini Cheesecakes

Last week slipped by me and I barely realized it until a while later, and I was determined not to let this week do the same thing. This week was pretty busy as well with all of the things we needed to do to get ready for the military ball we had this weekend (which was amazing), but about halfway through the week I got this crazy strong urge to do some baking, and this recipe was something I'd been wanting to try for a while. My husband is a huge fan of pumpkin pie, and I like to mess around with it just a bit and put that flavor into other fun things, so I decided to make Mini Pumpkin Pie Frosted Cinnamon Cheesecakes. They were amazing, they didn't look the greatest so I did not get a good picture to share, (note, when you frost them either do it with a knife or a star tip, not a round tip!) but everyone loved them, I even brought some to work to share with my coworkers and they liked them too. Here's the recipe and I hope you enjoy them too :)


Mini Pumpkin Pie Frosted Cinnamon Cheesecakes


  • 1 cup graham cracker crumbs
  • 1/4 cup unsalted butter, melted
  • 1 pinch salt
  • 16 ounces cream cheese, room temperature
  • 1/2 cup granulated sugar
  • 2 tablespoons granulated sugar
  • 2 large eggs, room temperature
  • 1/3 cup heavy cream
  • 1/2 tablespoon pure vanilla extract
  • 1 tablespoon ground cinnamon
  • 1 (15 ounce) can pumpkin puree
  • 3/4 cup brown sugar, packed
  • 1/4 teaspoon salt
  • 1 1/2 teaspoons pumpkin pie spice
  • 2 eggs
  • 1/2 cup evaporated milk
  • 1/2 cup heavy cream


Preheat oven to 350 degrees and prepare 12 baking cups with paper liners. In a separate bowl, whisk together the first three ingredients until well blended. Scoop 1 packed tablespoon of crust into each baking cup, and press down to pack firm. Bake for 10 minutes at 350 degrees, then remove and set aside.
Preheat oven to 325 degrees F. Begin to boil a large kettle or pot of water for the water bath (if you have a pan large enough for the cupcake tin to sit in follow this step, it will help the cheesecakes cook more evenly and not dry out, if not though, don't worry about it. I didn't have one and they still turned out great).
In the bowl of your stand mixer fitted with a paddle attachment (or you could use a hand mixer) combine the cream cheese and 1/2 cup plus 2 T. sugar, then mix on medium-speed until smooth. Add eggs, one at a time, fully incorporating each before adding the next. Make sure to scrape down the bowl in between each egg. Add heavy cream, vanilla and cinnamon, and mix until smooth. Pour batter into each crust-prepared baking cup until 3/4 full.
Once your kettle or pot of water is boiling, carefully place a large baking dish on the lower rack of your oven and pull the rack out a few inches towards you, and then pour the water into it. This will create a water bath that will give off lots of steam while the cheesecake bakes.
Then place the cheesecake pan in the oven, and bake for about 25 minutes, or until the edges appear to be set and the center still has a slight jiggle to it. Turn off the oven and open the oven door slightly for 5 minutes. Then remove the pan and place on a cooling rack until completely cooled. Top with pumpkin pie frosting.

For the pumpkin pie frosting: Preheat oven to 425 degrees. In a mixing bowl, whisk together all ingredients until well blended. Pour into a greased 9-inch pie pan and bake for 30-40 minutes, or until a toothpick inserted into the center of the pie comes out clean. Remove and let cool, then refrigerate.
When ready to "frost" the cheesecakes, remove the pumpkin pie and spoon the filling into a piping bag. Use as you would regular frosting.

Sunday, January 27, 2013

Anniversary Dinner

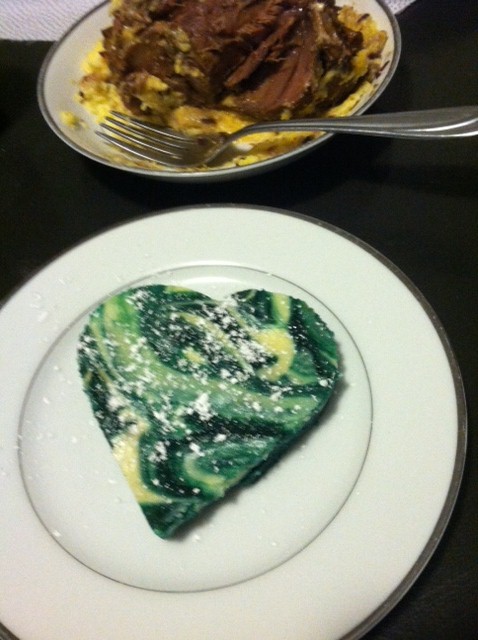
Last week my husband and I celebrated our 3rd anniversary, and rather than going out somewhere and spending tons of money we decided to continue a tradition we started the year before trading off on who cooks the meal. Last year, my husband surprised me when I came home from work on our anniversary with a meal I had been planning on cooking already made. This year I decided to try a recipe we had in a restaurant in disney world that we both greatly enjoyed, braised lamb shanks. Along with that I made a red wine reduction and parmesan polenta (which actually turned out great this time, no lumps!). For dessert I did red velvet cheesecake brownies from a previous post, which ended up being blue cause I was out of red food coloring! The polenta and brownies were already posted so I'll just be sharing the lamb shanks and red wine reduction recipes tonight. It may sound difficult and while it's not exactly a beginners recipe, it's still rather simple and it tastes great. Lamb is a bit more expensive and difficult to find, but it is one of my husbands favorite foods, so it's definitely worth it for special occasions. Enjoy :)


Braised Lamb Shanks


  • Extra-virgin olive oil
  • 4 lamb shanks (each about 1 1/4 pounds; 1 shank is a portion)
  • Kosher salt
  • 1 large Spanish onion or 2 small yellow onions, cut into 1-inch dice
  • 3 carrots, peeled and cut into 1/2-inch dice
  • 3 celery ribs, cut into 1/2-inch dice
  • 4 cloves garlic
  • 1 (12-ounce) can tomato paste
  • 2 cups hearty red wine
  • 2 tablespoons finely chopped rosemary leaves
  • 10 to 12 thyme branches tied together in a bundle
  • 3 to 4 cups water
  • 4 bay leaves

Preheat the oven to 400 degrees F. Coat a large oven safe pot generously with olive oil and bring to a medium heat. Season the shanks generously with salt and add them to the pan. Brown well on all sides, it might go quickly so keep an eye on it while you puree the veggies. Meanwhile, puree the onions, carrots, celery and garlic in a food processor until it becomes a coarse paste. Remove and set aside.

Remove the shanks from the pan to a sheet tray. Discard the excess fat from the pan. Add a little more oil to coat the bottom of the pan and add the pureed veggies. Season with salt, to taste. Saute the veggies until they are very brown and aromatic, about 10-15 minutes. Take care not to let it get too brown. Add the tomato paste and brown for 5 minutes. Stir in the wine, chopped rosemary and thyme bundle. Stir frequently and cook until the wine has reduced by about half.

Add the shanks back to the pot and pour in 3 to 4 cups of water. The shanks should be submersed, if they are not, add more water (I needed closer to 8-10 but it'll change depending on the size of your shanks)  Add the bay leaves to the pan, cover and put in the preheated oven. The cooking time will be about 2 1/2 to 3 hours. Turn the shanks over about halfway through the cooking time. Check the shanks every 45 minutes or so. If the liquid has reduced too much add more water. 

Remove the cover during the least 30 minutes for some extra browning. When the shanks are done the meat should be incredibly tender and flavorful. Serve on top of Parmesan Polenta and drizzle with the red wine reduction. Enjoy!


Red Wine Reduction

  • olive oil, for coating the pan
  • 1/4 cup shallots, minced
  • 1/2 cup red wine
  • 1/2 cup beef stock
  • 2 tablespoons butter

In a saute pan, over medium high heat, add enough olive oil to coat the pan. Add the shallots and cook until translucent. Add the red wine and the stock and reduce by half.* Add the butter.

*if you would like a smoother sauce you can strain the shallots out at this point then return to the pan and add the butter.

(no pictures of the wine reduction on it's own, so here's a picture of dessert! I used a cookie cutter in the pan and dusted it with powdered sugar)

Sunday, January 20, 2013

Pot Roast and leftovers

I thought I had already given my pot roast recipe, but try as I might as I look back over the posts I can't find it, so it'll be more like a bonus! This week I had a few things I wanted to talk about that aren't even related to cooking (I know, I'll keep it short) Lately on Pinterest I've been getting into a lot of home improvement things, finding out some things I wanted to share, first off being a cure for those nasty yellow armpit stains! Go here to see the recipe, but I can vouch for it as being awesome! Now I don't have to pass up those white shirts at goodwill cause of the stains, or throw out old shirts cause of it! The other thing I found out is that you're supposed to wash pillows, and apparently 3 times a year at that. I had no idea, I though you just tossed them when they got old enough :/ but now I have clean pillows! You can find a good way to do that here. And now, for the recipes. I love my pot roast recipe and my husband thinks it's amazing, it's always moist, flavorful and even the leftovers continue tasting great. It's super easy too, and if you make enough of it you can make what I made with our leftovers, which were Pot Roast Sliders. Also very easy and a fun way to redo the leftovers :) Enjoy!


Amazing Pot Roast (Sorry if it's a repeat!)


  • 1 packet gravy mix (any brand or type, I've used beef and turkey before)
  • 1 packet ranch dip mix
  • 1 packet dry onion soup mix
  • 2-3 pound roast
  • 1/2 cup water
Mix all of the dry mixes together and sprinkle on top of the roast in the crock pot. Pour the water along the side, not over the roast and cook on low for 4 hours or high for 6-8. The longer the more tender and more flavor will soak into it. 


Pot Roast Sliders
  • Pot Roast
  • Hawaiian rolls
  • Horseradish sauce
  • Swiss Cheese
Bake the rolls until they're golden brown, and layer the ingredients on the rolls. Enjoy! Be careful though, the horseradish can be quite hot if you're not used to it. Ranch dressing or mayonnaise would be good substitutes as well :)

Sunday, January 13, 2013

Eating out or eating in?

This week I decided to try a recipe my husband had pointed out as being interested in, Korean Bbq Beef Skewers, and at the last minute I paired them with some bacon wrapped asparagus on the grill, a recipe I already shared a while ago here. The skewers were surprisingly tasty, and if you've done some of the recipes before from the blog you might already have most of the ingredients around the house! After I had made these I took the time to think through all of the ingredients I had bought and how much it was as opposed to how much it would cost us if we had eaten out, and the results made me very happy. I got pretty much everything on sale: my steak, bacon and asparagus, and with drinks and such it was about $20 to make this meal that feeds 4. It is a little on the high side for the meals I usually make at home, but it was a great meal, and after figuring in the tip and drinks, if we would have eaten out something like this it would have cost somewhere around $60. It's not quite the same experience as going out to eat of course, but when money is tight and you want to still have a date night, a nice meal paired with a bottle of wine and some candles can do in a jiffy and save you money :) That's enough on that though, time for the recipe!


Korean BBQ Beef Kebabs


(yay! My photos are uploading normally again)

  • 1 1/2 lb. sirloin steak, cut against the grain into thin (about 1/4″) slices
  • 1/2 c. rice wine or pear juice (1 4 oz. bottle of pear juice from the baby food aisle is perfect and cheap)
  • 1/2 c. low-sodium soy sauce (I used regular soy sauce and thought the taste was fine)
  • 2 Tbsp. brown sugar
  • 2 Tbsp. minced garlic
  • 1 tsp. Sriracha chili sauce
  • 1 1/2 tsp. sesame oil

Combine wine or pear juice, soy sauce, brown sugar, garlic, chili sauce, and sesame oil in a large bowl. Add sliced steak. Marinate at room temperature for 1 hour or up to 8 hours in the refrigerator. Preheat the grill (or grill pan, in my case). While the grill is heating, thread the steak pieces onto (pre-soaked) bamboo skewers. Cook over medium-high heat for about 3-4 minutes per side, being careful not to let the meat get too cooked. If you like your meat more rare lean towards closer to 1-2 minutes, mine cooked very quickly. Serve immediately; serves 4-6.

(recipe from Our Best Bites )

Sunday, December 30, 2012

Merry Christmas and a Happy New Year!

With the holidays rushing up on us I didn't quite have a chance to do a blog post last sunday, so instead I have several recipes I'll share today as one large holiday post! This Christmas we decided to stay here rather than go home for the holidays, it's one of the less fun things about being a military family and having to choose between these things, but we do hope to make the rounds sometime next year. I worked a lot the week before so I hadn't had a chance to do any meals besides crock pot ones, and we did get to try out all of those crock pot meals from that post long ago. The verdict is that all but the teriyaki chicken were great, good flavor, veggies, and for our family made one and a half dinners per bag, but after a week of that I was itching to cook something myself. One thing my husband had been wanting since he got home was venison, and my boss's husband is a hunter and was nice enough to give us a good amount of venison meat to cook up some fun meals with. We got ground, sausage, stew meat and cubed steak. I decided to do one of my favorite dishes using one of my husbands favorites meats: Chicken fried venison steak with sawmill gravy. It turned out great, I had tried making this sort of gravy once before, but I had rushed it too much and it ended up being kinda off, this time it was amazing. To go along with it, my husband had been asking for some sort of a peach crumble, so I decided to do a peach dump cake. It is the easiest dessert I've ever made and it tasted pretty awesome, I might have to keep the ingredients around the house for emergency visitor desserts. So, without further adieu, the recipes.


Chicken Fried "Steak" and Sawmill Gravy


  • 1½ pounds top-round steak (or cubed steak, if you used the cubed skip to the step where you season it with salt and pepper)
  • 1½ cups all-purpose flour
  • 1 teaspoon kosher salt
  • 1 teaspoon black pepper
  • ½ teaspoon cayenne pepper
  • 3 eggs
  • ½ cup buttermilk
  • Vegetable oil, for frying
  • ¼ pound breakfast sausage
  • 2 tablespoons all-purpose flour
  • 1½ cups whole milk
  • Salt and black pepper, to taste

Cut the top-round steak into four pieces. Working with one piece at a time, place on a sturdy cutting board or clean counter-top, cover with a large piece of plastic wrap, and pound the beef with a meat tenderizer until flattened and almost doubled in size (you want the meat to be about ¼-inch thick). Repeat with the remaining pieces. Sprinkle pieces of beef with salt and black pepper. In a large, shallow bowl, whisk together the flour, salt, black pepper, and cayenne pepper. In another large, shallow bowl, whisk together the eggs and the buttermilk. Take a piece of the tenderized meat and dip it in the egg mixture. Next, place the meat in the bowl of seasoned flour. Turn to coat it thoroughly. Place the meat back into the egg mixture, turning to coat. Finally, return it back to the flour mixture, ensuring that it is evenly coated on both sides. Place on a clean baking sheet and repeat with the remaining pieces of meat. In a large, 12-inch skillet, heat ½ inch of vegetable oil over medium-high heat until a small fleck of flour dropped in the pan sizzles. Carefully place one or two pieces of the meat (whatever fits comfortably without overcrowding) into the skillet. Cook for 3 to 4 minutes, or until the blood starts bubbling out of the top of the steak. Using a pair of tongs, gently turn over the steaks and cook for 5 more minutes. Remove the steaks to a cooling rack to drain while you finish frying the remaining steaks. You can place the cooked steaks in a 200-degree oven to keep warm. Finally, make the sawmill gravy. (You can start this in another pan while the last piece of steak is cooking, or do like I did, make it ahead of time and right before the last steak is done cooking, heat it up and add a bit of milk to bring the moisture back to it) In a skillet over medium heat, cook the sausage until browned, crumbling it as it cooks. With a slotted spoon, remove the sausage from the skillet and place on a plate. Drain the oil from the pan, reserving 2 tablespoons in the skillet (if your sausage didn't yield enough drippings, you can use vegetable oil to get to the 2 tablespoons). Sprinkle the flour over the drippings, and whisk together, cooking for about 2 minutes. Add the milk slowly to the skillet, whisking continuously. Reduce the heat to medium-low and continue whisking until the mixture is thickened, about 5 more minutes (Keep going until it's a consistency you like). Remove from the heat, stir in the reserved sausage, and season to taste with salt and black pepper. (If the gravy is too thick, you can thin it by whisking in more milk, a tablespoon at a time.) Serve the steaks with the sawmill gravy poured over top. Next time I will double the gravy recipe because gravy is freaking amazing, and if you like it too I suggest you do the same!


Note: For the buttermilk I used my pre frozen cubes as I never use a full thing of buttermilk. If you have leftovers and want to save it, measure 2 tablespoons in each spot in an ice cube tray and freeze it. Once frozen, put in a zip lock bag and label with whats in it and how much in each cube and put back in the freezer. 4 TB in 1/4 cup and 8 in 1/2, so I used 4 cubes with this.


Peach Dump Cake

(I didn't get a picture of this, it disappeared too quickly!)

  • 24.5 oz jar of sliced peaches in light syrup (or use fresh)
  • 1 package yellow cake mix
  • 1 stick butter (1/2 cup), cut into 16 pieces
  • 1 cup brown sugar
  • 1/2 cup chopped walnuts (optional)
Preheat oven to 350 degrees F. Layer ingredients in a 13 X 9 dish, in order starting with the peaches. Bake for about 40 minutes. Serve warm or cold… with or without ice cream. See? Easy!


Sunday, December 16, 2012

Pumpkin Cinnamon Rolls


With the holidays coming around, one of my husbands favorite things is pumpkin pie, but rather than just have the same thing over and over I wanted to mix things up a bit. And the first attempt at doing so were the Pumpkin Cinnamon Rolls that I made this week. It was also my first time making homemade cinnamon rolls, and while that was quite daunting at first it really went well I think. The recipe is fairly easy to whip together (the hardest part is all of the rolling, but that wasn't too bad) and will definitely be something I might try again for company some time :)


Pumpkin Cinnamon Rolls


(again with the weird photos, I might have to change websites soon)
  • 1 cup canned pumpkin or squash
  • 2 large eggs
  • 2 tablespoons to 1/4 cup lukewarm water*
  • 1/4 cup soft butter
  • 2 1/2 cups unbleached all-purpose flour
  • 1 3/4 cups King Arthur White Whole Wheat Flour
  • 1/4 cup nonfat dry milk
  • 1 tablespoon pumpkin pie spice
  • 3 tablespoons brown sugar, light or dark
  • 1 1/2 teaspoons salt
  • 2 teaspoons Red Star Quick Rise Yeast or instant yeast

*Adjust the amount of water by the time of year or your climate. For summer, or in a humid environment, use the lesser amount of water. In winter, or in a dry climate, use the greater amount. It's always best to start with the lesser amount; you can always add more. (I used the full 1/4 cup of water in my rolls).
  • 3 tablespoons unsalted butter, melted
  • 2/3 cup light brown sugar, packed
  • 1 tablespoon pumpkin pie spice
  • 1/2 cup chopped pecans
  • 4 ounces cream cheese, softened
  • 4 tablespoons unsalted butter, softened
  • 1/4 cup pure maple syrup (I used Grade A)
  • 1/2 cup confectioners’ sugar, sifted (see recipe notes)
  • 1/2 teaspoon pumpkin pie spice

Mix and knead all of the dough ingredients (up to the note on water) together — by hand, mixer, or bread machine — until you've made a soft, fairly smooth dough, it should be fairly sticky, if it isn't, add a couple more tablespoons of water. Place the dough in a lightly greased bowl, cover the bowl, and allow the dough to rise for about 1 1/2 hours, until it's almost doubled in bulk. Turn the dough out onto a lightly greased surface. Roll it into a 14" x 22" rectangle; the dough will be pretty thin. Use a pastry brush to brush the melted butter onto the top of the dough. In a medium bowl, mix together the next 4 ingredients and sprinkle them onto the butter creating an even layer, leaving one short edge free of filling (about 1 inch). Starting with the short end that's covered with filling, roll the dough into a log. Cut the log into nine 1 ½"-thick rolls, it's better if you mark out the cuts before fully cutting through to get them pretty even.
Place the rolls into a lightly greased 9" x 9" pan that's at least 2" deep. Set aside, covered, to rise for 1 hour, or until the rolls look puffy. Bake the rolls in a preheated 375°F oven for 25 to 30 minutes, until they're lightly browned and feel set. Remove them from the oven, and set them on a rack. Turn them out of the pan, and allow them to cool for about 15 minutes. Towards the end of the cooling time, make the glaze. To make the glaze: In a medium bowl with an electric mixer, combine the cream cheese, butter, maple syrup, confectioners' sugar and pumpkin pie spice. Mix on low speed until thoroughly combined and creamy. Feel free to adjust the frosting to meet your needs. If you like a thinner frosting, add in a little milk (start with 1 teaspoon) and slowly increase until you reach the desired consistency. If you want it to be thicker, add in a little more confectioners' sugar.

(another attempt fail)

Sunday, December 2, 2012

Pasta Salad

The last week has been crazy and weird and wonderful, getting used to sharing my home again with my husband. We went to a day of reintegration training together, during which a chaplain got up to give us a talk about learning how to be married again and covered everything but marriage  Up to and including: Schizophrenia, Abortion, Politics and LSD. It was... interesting to say the least, definitely not what I was expecting. I haven't had a lot of time to try out new recipes, but I did get to try out one that I'd been wanting to do for a while that I thought he would love in particular, and it was a great hit. I got this one off of pinterest, and a cold pasta salad really fit in well with the warm weekend we've been having here.


Garden Pasta Salad

(I have no idea what is going on with my photo uploader, every time I tried to upload it there were different colors running through it! It got a bit entertaining after a while, so I included all of the photos)

  • 1-3/4 cups farfalle (bow-tie pasta), uncooked
  • 2 cups small broccoli florets
  • 1-1/2 cups ham steak, chopped
  • 2 cups halved cherry tomatoes
  • 1/4 cup finely chopped red onions
  • 1/4 cup Ranch Dressing
  • 1/4 cup Parmesan Shredded Cheese
  • 1/4 cup chopped fresh dill


Boil pasta as directed on package, omitting salt and adding broccoli to the boiling water for the last 3 min; (We left our broccoli raw, as my husband likes it better that way) drain. Rinse under cold running water; drain again. Mix ham, tomatoes, onions and dressing together in large bowl. Add pasta; toss to coat and with cheese and dill. The best part about this recipe is you don't even really have to measure it, you can change the ingredient amounts to your liking (or to what you have on hand!) and mix up the veggies as you have available. Enjoy!