Sunday, July 29, 2012

Sliders and Veggie fries

One of the shows on the food network that I enjoy watching sometimes is Diners, Drive ins and Dives. I love diner food, and seeing the different ideas these places come up with is really neat and inspiring. The sliders that I made this week were inspired by one of those episodes, and were a big kick the first time I made it a few months ago. Thought I'd do it one more time and just tweak the recipe a little bit, and they were even better! I wanted something to go with it but didn't wanna do traditional fries, so I thought I'd try a few variants, and did zucchini fries and sweet potato fries. I'm not a huge sweet potato fan but they both turned out pretty good, not as addicting as normal fries but a lot healthier!

Basil Pesto Sliders


  • 12 Potato rolls (any type of roll will work really, but the potato ones have my favorite flavor for this)
  • 1/2 pound ground pork
  • 1/2 pound ground beef
  • 6 strips of bacon, cooked and chopped
  • Olive oil
  • 1/2 onion, diced
  • 2 cloves of garlic, minced
  • 2 t italian seasoning
  • 1/4 t chili powder
  • 1/4 t cayenne powder
  • salt and pepper to taste
  • 1/2 cup shredded cheddar cheese
  • 1/2 cup mayonnaise
  • 1 1/2 t basil pesto
  • 1/4 t dijon mustard
  • 1/2 t rice vinegar
In a small bowl, mix the mayo, pesto, vinegar, mustard and salt and pepper to taste. Heat the oil in a small frying pan (or use the grease from frying the bacon) and add the onion, garlic and seasonings. Cook until the onions are soft, stirring frequently. Mix the onion and seasoning mixture in a bowl with the meat and roll into balls. I use a big griddle for frying it up but you can use a regular nonstick frying pan. Coat it in butter and brown the burger patties, flattening them while they cook. As they cook, cut the potato rolls in half and toast them on the griddle. After flipping the burgers once, sprinkle them with some of the cheese and bacon and cover with a pot lid to melt the cheese. Spread the bottom roll with the mayo mixture and top with a patty and the top bun. These are so tasty, you can add whatever toppings you'd like, but the basil pesto mayonnaise really has a nice flavor to it and goes so well with the burgers. Enjoy!

Baked Zucchini fries


  • 3 medium zucchini, sliced into skinny sticks
  • 2 large egg whites, beaten
  • 1/2 cup bread crumbs
  • 2 T grated parmesan cheese
  • 1/4 t dried basil
  • pinch of dried oregano
  • 1/4 t garlic powder
  • salt and pepper to taste
Preheat the oven to 425 degrees. Spray a cooking sheet with cooking spray and set aside. In a small bowl beat the egg whites until frothy. Mix the bread crumbs, seasonings and cheese in a shallow dish. Dip the zucchini sticks in the egg and then in the bread crumb mixture before placing on the cooking sheet. Make sure they're well coated. Bake for about 20 minutes or until golden brown and a little crispy. Turn them over halfway through cooking to make sure they get brown all the way around. Serve warm and enjoy! They go well dipped in marinara like mozzarella sticks, or ranch dressing which is my favorite!

Baked Sweet Potato fries


  • Olive oil
  • 5 sweet potatoes, peeled and sliced into skinny sticks
  • 1/2 t paprika
  • 1/4 t garlic powder
  • salt and pepper to taste 
Preheat oven to 450 degrees. Line a sheet tray with parchment. In a large bowl toss the sweet potatoes with just enough oil to coat them. Sprinkle with the seasonings and spread in a single layer on the baking sheet, make sure not to over crowd. Bake until they're tender and golden brown, turning occasionally about 20 minutes. Let cool 5-10 minutes before serving.

Sunday, July 22, 2012

Foil baked fish and lemonade cake, yum!

This week I decided to do something light and fresh and summery, and some of the first things that came to mind were fish and lemonade. I miss the days when I was younger and would go out to my grandpa's and go fishing off his dock. I have this cook book that I bought before our wedding that I used as one of our guest books (the other was a calvin and hobbs book, my husbands choice!) that has this delicious recipe for Foil-Baked fish with Black Beans and Corn, and I've made it once before, with rave reviews from everyone who had it, even though it was a little bit too spicy for my tastes. So fair warning, I have cut down on the spicy already, but if you and your family aren't fans of too much kick, feel free to omit the adobo chiles altogether, it'll still taste great. I don't live near my family anymore, so I wasn't able to go fishing and had to settle for store bought, but if you get good flash frozen or fresh fish from the store it'll taste just as good. Foil baking is a great way to cook, allowing the food to steam in it's own juices, keeping it nice and moist. Though I haven't tried it, I suppose this recipe would go well grilling or over a fire for some fancy camping food, don't even really neat plates! To follow it up I had seen this awesome looking lemonade cake on pinterest and thought that would go well to keep things light, bright and summery. Enjoy!


Foil-Baked Fish with Black Beans and Corn


  • 4 skinless white fish fillets (6-8 ounces each), 1 inch thick (You can use halibut, cod, haddock or most other white fish fillets. I used cod cause I found it to be the cheapest)
  • salt and pepper
  • 4 T unsalted butter, softened
  • 1 t minced canned chipotle chiles in adobo 
  • 1/4 t grated zest, and 2 T juice from 1 orange 
  • 2 garlic cloves, minced
  • 1 (16 ounce) can of black beans, drained and rinsed
  • 2 cups corn kernels
  • 1/4 cup chopped fresh cilantro (my local grocery store doesn't carry cilantro and I forgot to pick some up on my big trip into town, but I have this cilantro spray. Not as good as fresh but it helps when I'm not able to get any fresh)
Adjust the oven rack to lower-middle position and preheat the oven to 450 degrees. Pat the fish dry with paper towels and season with salt and pepper. Beat the butter, 1/2 t of chipotle, orange zest, half of the garlic, 1/2 t salt and 1/4 t pepper in a bowl until combined. Spread the butter mixture over the top of the fillets. Combine the beans, corn, 2 T cilantro, orange juice, remaining chipotle and garlic, 1/2 t salt and 1/4 t pepper in a bowl. Lay four 14-inch lengths of heavy duty foil on the counter (regular will work, but it might leak and thats never fun for the cooking or clean up) Divide the mixture evenly over the lower half of each piece of foil, and then top with the fish. Fold the foil over the fish, folding edges to seal. 
Arrange the packets in a single layer on a rimmed baking sheet and bake until the fish is just cooked through, about 15-20 minutes. Carefully open the packets and sprinkle with the remaining cilantro. 

Lemonade Layer Cake


Cake
  • 1 1/3 cup granulated sugar
  • 6 T butter, softened
  • 1 T grated lemon zest
  • 3 T thawed lemonade concentrate
  • 2 t vanilla extract
  • 2 large eggs
  • 2 large egg whites
  • 2 cups all-purpose flour
  • 1 t baking powder
  • 1/2 t salt
  • 1/2 t baking soda
  • 1 1/4 cups fat free buttermilk (if it's not something you use often, you can freeze the rest in 2 T servings in an ice cube tray, transfer them to a zip log bag, label and store for the next time!)
  • Cooking spray
Frosting
  • 2 T butter, softened
  • 2 t grated lemon zest
  • 2 t thawed lemonade concentrate
  • 1/2 t vanilla extract
  • 8 ounces of cream cheese
  • 3 1/2 cups powdered sugar

  1. Preheat oven to 350 degrees. To prepare cake, place first 5 ingredients in a large bowl; beat with a mixer at medium speed until well blended (about 5 minutes). Add eggs and egg whites, 1 at a time, beating well after each addition. Lightly spoon flour into dry measuring cups; level with a knife. Combine flour, baking powder, salt, and baking soda; stir well with a whisk. Add flour mixture and buttermilk alternately to sugar mixture, beginning and ending with flour mixture; beat well after each addition. Pour batter into 2 (9-inch) round cake pans coated with cooking spray; sharply tap pans once on counter to remove air bubbles. Bake at 350° for 20 minutes or until wooden pick inserted in center comes out clean. Cool in pans 10 minutes on a wire rack; remove from pans. Cool completely on wire rack.
  2. To prepare frosting, place 2 tablespoons butter and the next 4 ingredients (2 tablespoons butter through cream cheese) in a large bowl; beat with a mixer at high speed until fluffy. Add powdered sugar, and beat at low speed just until blended (do not overbeat). It'll be quite thick but don't worry, it spreads very well. Chill 1 hour.
  3. Place 1 cake layer on a plate; spread with 1/2 cup frosting. Top with remaining cake layer. Spread remaining frosting over top and sides of cake. Garnish with lemon slices if you would like. Store cake loosely covered in the refrigerator.


Sunday, July 15, 2012

Chicken and Waffles!

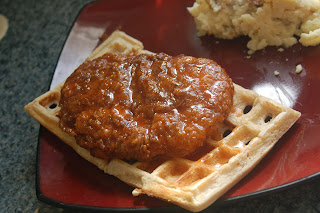
Alright, I know it might sound strange, but chicken and waffles are amazing! The mixture of crunchy, soft, sweet and savory is just delicious. You can have them many different ways, some people like it just drizzled in syrup, but personally I like to add a bit of a bite to it. When I was in Disney world with my husband last, we had this amazing chicken and waffle sandwich there, and this is my attempt to at least sort of recreate it. If you don't like spicy, feel free to change the sauce to your tastes, or go with something completely different. If you haven't had chicken and waffles before, don't be afraid to try it! It really is quite good, and sort of fun, but if you don't want to, the waffle and chicken recipes separately are really good as well. Also I decided to try making collard greens as well, as chicken and waffles is sort of a southern thing, and I wanted to add a southern veggie to the meal as well. Collard greens can be a bit bitter, but this recipe really was quite good, with some nice flavors, and the broth cut the bitterness really nicely.

Alton Brown's Basic Waffles


  • 4 3/4 ounces all-purpose flour, approximately 1 cup
  • 4 3/4 ounces whole-wheat flour, approximately 1 cup
  • 1/2 teaspoon baking soda
  • 1 teaspoon baking powder
  • 1 teaspoon salt
  • 3 tablespoons sugar
  • 3 whole eggs, beaten
  • 2 ounces unsalted butter, melted (Not margarine! Using actual butter is very important when you're baking)
  • 16 ounces buttermilk, room temperature
  • Vegetable spray, for waffle iron
(Most of his measurements are in ounces, but if you don't have a scale, just do around a cup of each of the flours, 2 cups of buttermilk, and a half of a stick of butter, it will turn out fine)
 
Preheat waffle iron according to manufacturer's directions.
In a medium bowl whisk together the flours, soda, baking powder, salt, and sugar. In another bowl beat together eggs and melted butter, and then add the buttermilk. Add the wet ingredients to the dry and stir until combined. Allow to rest for 5 minutes.
Ladle the recommended amount of waffle batter onto the iron according to the manufacturer's recommendations. Close iron top and cook until the waffle is golden on both sides and is easily removed from iron. I found that these take a bit longer than your usual out of the box waffle batter to crisp up and brown. Serve immediately or keep warm in a 200 degree F oven until ready to serve.


Double Crunch Chicken Breasts


  • 4  large boneless chicken breasts  
  • 2 cup flour
  • 4 tsp salt
  • 4 tsp black pepper
  • 3 tbsp ground ginger
  • 2 tbsp ground nutmeg
  • 2 tsp ground thyme
  • 2 tsp ground sage
  • 2 tbsp paprika
  • 1 tsp cayenne pepper
  • 4 eggs
  • 8 tbsp water
Place the chicken breasts between two pieces of saran wrap and pound flat, or to help have thinner chicken breasts, or if you don't have anything decent to pound them flat with, you can butterfly them first. Sift together the dry ingredients in one dish, and beat the eggs and water together in another to make an egg wash.
Season the chicken breasts with salt and pepper, then dip the meat in the flour and spice mixture. Dip the breast into the eggwash and then a final time into the flour and spice mix, pressing the mix into the meat to get good contact.
 Heat a skillet on the stove with about a half inch of canola oil covering the bottom. You will want to carefully regulate the temperature here so that the chicken does not brown too quickly. The thinness of the breast meat practically guarantees that it will be fully cooked by the time the outside is browned. I find just below medium heat worked well. I use a burner setting of about 4 1/2 out of 10 on the dial and fry them gently for about 4 or 5 minutes per side until golden brown and crispy.

Drain on a wire rack for a couple of minutes before dipping the cooked breasts into the sauce or serving. For my sauce, I simply took a cup of honey, added some siracha chile sauce to it until it was the right spice level for my tastes, and then added a teaspoon of garlic powder, but if you'd prefer a less spicy option I do have another.
 
 (My absolute favorite way to have chicken and waffles is with some creamy coleslaw on top. The recipe is in last weeks blog post, and sadly I didn't get a picture of the chicken and waffles with the coleslaw, but go ahead and try it if you'd like! It goes awesomely with it)
 
 
Honey Garlic Sauce

2 tbsp olive oil
3 – 4 cloves minced garlic
1 cup honey
¼ cup soya sauce (low sodium soya sauce is best)
1 tsp ground black pepper
 
In a medium saucepan, heat the olive oil and add the garlic. Cook over medium heat to soften the garlic but do not let it brown, should only take 30 seconds or so. Add the rest of the ingredients. Simmer together for 5-10 minutes, remove from heat and allow to cool for a few minutes. Watch this carefully as it simmers because it can foam up over the pot very easily.
 
 
Sauteed Collard Greens


2 bunches collard or kale greens, about 2 pounds
3 tablespoons olive oil
4 garlic cloves, whole
2 quarts chicken broth
1 tablespoon vinegar
Kosher salt and freshly ground black pepper

To prepare the greens: cut away the tough stalks and stems from the collards and discard any leaves that are bruised or yellow. Fill the sink with water and salt, the salt helps to remove any impurities. Wash the collards thoroughly to remove the grit, 2 or 3 times, until the water runs clear. Dry thoroughly. Stack up several leaves and roll up lengthwise in a bundle, cut them into 1-inch ribbons. Repeat until all the leaves are shredded. Or you can use the pre washed and cut collard greens, just make sure to dry them very well or your pan will explode when you add them!
Heat a large deep skillet over medium flame and coat with the oil. Add the garlic and saute for 2 minutes to soften. Add the greens and toss well with the oil and garlic. Pour in the chicken broth and cook for 45 minutes to 1 hour until the greens are wilted and tender; You can cook them for a bit less if you prefer a bit of a crunch to them as I do. Season with salt and pepper and serve. 
 

Sunday, July 8, 2012

4th of July!

Hope you all had a wonderful Independence day! Mine was great, throwing together some last minute plans with some friends, with good food, good company and of course fireworks! Normally the 4th would mean hot dogs (or brats!) and hamburgers in my family, so this year I wanted to try something new and decided baby back ribs sounded good. Trouble is, we don't have a grill, so I decided to do them in the oven instead, and they turned out delicious! The kids and adults liked them, and they were so packed with flavor. I also made some coleslaw, another first for me, and it turned out pretty good. I didn't cut the cabbage quite thin enough, but it was still very tasty. Sorry the pictures aren't too great this week, I forgot to bring along my camera and had to settle for the one on my phone.

Baby Back Ribs


Ingredients:

  • 2 whole slabs pork baby back ribs (or you can substitute beef, but I haven't tried it so I'm not sure how they'd turn out)

Dry Rub:

  • 8 tablespoons light brown sugar, tightly packed
  • 3 tablespoons kosher salt
  • 1 tablespoon chili powder
  • 1/2 teaspoon ground black pepper
  • 1/2 teaspoon cayenne pepper
  • 1/2 teaspoon Old Bay Seasoning
  • 1/2 teaspoon thyme
  • 1/2 teaspoon onion powder 

Braising Liquid:

  • 1 cup white wine
  • 2 tablespoons white wine vinegar
  • 2 tablespoons Worcestershire sauce
  • 1 tablespoon honey
  • 2 cloves garlic, chopped

Preheat oven to 225 degrees. In a bowl, combine all dry ingredients and mix well. Place each slab of baby back ribs on a piece of heavy-duty aluminum foil, shiny side down. Sprinkle each side generously with the dry rub and pat it into the meat. Top the ribs with another sheet of aluminum foil and fold the edges to seal it. Refrigerate the ribs for a minimum of 1 hour. In a microwavable container, combine all ingredients for the braising liquid. Microwave on high for 1 minute.
Place the ribs on a baking sheet. Open one end of the foil on each slab and pour half of the braising liquid into each foil packet. Tilt the baking sheet in order to equally distribute the braising liquid. Braise the ribs in the oven for 2 1/2 hours. To test to make sure it's done, either cut them in half and check the color, or if you try to twist one of the bones about a third of the way into the rack and it actually gives way and moves, it's done.
Once the ribs are done, transfer the braising liquid into a medium saucepot. Bring the liquid to a simmer (just before a boil) and reduce by half or until of a thick syrup consistency. Brush the glaze onto the ribs. Place under the broiler just until the glaze caramelizes lightly. Keep an eye on them, cause this can happen very fast, and quickly turn to black and burnt! Slice each slab into 2 rib bone portions. Place the remaining hot glaze into a bowl and toss the rib portions in the glaze.

Note: When I made this I completely failed and mixed up my timing and didn't get to the glaze portion as people were so hungry! They were still delicious, but definitely make sure you allow enough time for it to cook! Depending on the size of the rack of ribs it may take longer than the 2 1/2 hours to cook all the way through.

Creamy Cole Slaw


  • 1 head green cabbage, finely shredded
  • 2 large carrots, finely shredded
  • 3/4 cup mayonnaise
  • 2 tablespoons sour cream
  • 2 tablespoons grated Spanish onion
  • 2 tablespoons sugar, or to taste
  • 2 tablespoons white vinegar
  • 1 tablespoon dry mustard
  • 2 teaspoons celery salt
  • Salt and freshly ground pepper

Combine the shredded cabbage and carrots in a large bowl. You can use the store bought cole slaw mixes, but it's cheaper to do it yourself. Whisk together the mayonnaise, sour cream, onion, sugar, vinegar, mustard, celery salt, salt, and pepper in a medium bowl, and then add to the cabbage mixture. Mix well to combine and taste for seasoning; add more salt, pepper, or sugar if desired. 


Sunday, July 1, 2012

Guest Blog: Adjusting to the Gluten Free Lifestyle (of my husband)

Today’s Stars, Stripes, and Spatulas has been taken over by a guest blogger!  My name is Brit Gay, a close friend to our usual hostess, Carissa.   I live in South Georgia with my amazing husband (Matt), darling 2 year old daughter (Chloe), and our furry children: 2 cats and a dog.  


At the end of April, and beginning of May our household was hit with two double whammies.  Unfortunately, Matt lost his job, and is still seeking employment.  Not long after we find out that the reason he has been fatigued, having stomach issues, and skin break outs is attributed to the fact that he is highly sensitive to many foods that were consumed in our household on a near daily basis.  I won’t go into detail of the entire list because believe me, it is too long for either of us to remember. We have to keep a spreadsheet and constantly refer back to it!  The big issue for us has been his severe gluten sensitivity.  I don’t know about you, but I absolutely love baking.  My baking needs already suffered from Matt’s natural dislike for dessert, and now the few desserts of mine he did enjoy (I can make a killer buttermilk pie or amaretto pound cake) he can’t eat!

When Carissa asked me to guest blog for this week I set out to do a completely Matt-safe dinner, and I have succeeded.  Mind you, it was tough, and some of it hit the wallet a bit strong. Thankfully all of these recipes do not have to be gluten free. Everything can be substituted for your regular wheat consuming family.  Exact conversions too!


Blackberry Pecan Salad:

Ingredients:
Hearts of Romaine (or your favourite leafy green. Spinach would be amazing)
Pecan halves
Fresh and rinsed Blackberries
Pepperjack Cheese, crumbled (feta would work great)
Raspberry Vinaigrette Dressing


This salad is as simple as it gets, yet still unique and has an amazing flavor.  I go ahead and toss in all of the ingredients (except the vinaigrette) earlier in the day.  Cover and refrigerate until time to serve.  This way you’re not worrying about that untossed salad when your steaks are simmering!


Garlic Parmesan Encrusted Steak on a bed of angel hair pasta

Now for this, you can use the cheap cuts of steak (which we did) or you can go for your specialty cuts. Mind you, cooking time will differ depending on your preference of how you like your steak cooked.   We eat ours well done. Well, we do when I’m cooking. :-)

Garlic Parmesan Crust Ingredients:

1 cup Parmesan cheese (I had powdered on hand, but this recipe would be absolutely delicious with freshly grated Parmesan)
2 tbsp garlic powder
2 tbsp oregano
1 tbsp basil
A pinch of rosemary (I know some folks aren’t fans of this herb, and a small pinch goes a really long way.)
**I do not add salt to this recipe, because Parmesan already has a salty flavor
**Black pepper would go great in this recipe (or even cayenne!) My husband is sensitive to black pepper so we left it out.

Need to stretch this recipe, and don’t have enough parmesan? You can always do a very thin coating, and add a slice of fresh cheese near the end. I bet Pepper Jack Cheese would compliment this amazingly! You can also stretch the recipe by adding bread crumbs, but of course this isn’t an option for our family.

Directions:

Steaks should be room temperature prior to cooking for best results.  Also, go ahead and start cooking your pasta. You’ll want everything ready to serve immediately!

Heat Large skillet with oil to medium-high heat. Be careful not to let the oil pop on you! Safety first folks :).  Check the heat of your oil by dropping in some of the leftover crumbs.  If the oil sizzles, we are ready to start cooking!

After blending all ingredients, toss steak and pack well. Some will fall off, but keep the leftovers in case you need to add more after the initial turnings of the steak.Gently Lay each steak in the oil.  After about 3 minutes it is time to flip.  You will keep flipping your steaks so that they cook evenly on both sides, and the cheese doesn’t burn.  These steaks will brown up nicely, but we don’t want them blackened.   Cook these to your preference on how well you like your beef cooked.


aww look! It made a heart! I didn’t realize that until uploading the photo


Marinara Sauce

I am not a fan of premade sauces. One thing, they truly aren’t economical.  Two, They aren’t any easier (to me) than making homemade sauce.  Try out this recipe instead of grabbing your normal selection of spaghetti sauce.

Ingredients:

1 can tomato paste.  
1.5 can water (take the can and fill it up. I stir around the edges to get the extra paste out of the can)
2 tbsp olive oil
4 tbsp garlic powder
3 tbsp basil
2 tbsp Oregano
1-2 bay leaves (remove before serving)
½ tsp cayenne pepper (omit or substitute black  pepper if you’re not a fan of a touch of spice)
1 tbsp dried Chives
1 tbsp sugar (this may need more depending on the acidity of the tomatoes)
Pinch of Salt

Stir this gently over the sink before putting on the stove. You need to work the water and oil into the paste, and take special care to stir the bottom and edges of the pot.  It can burn, and we don’t want that.

I personally prefer to stick this on the stove on low for a few hours before dinner.  Stir it here and there, and let it simmer until you put your noodles on. Then bump up the heat for about 5-10, and get it nice and hot for serving!

For our gluten free man, I used rice noodles (they’re considerably whiter in color compared to your regular enriched wheat noodle).  If you are looking a gluten free alternative to pasta please check your local super market (our walmart doesn’t carry it, but our publix does!).  Sometimes stores will order things to put on the shelves for you if you ask.  Also check out local co-ops, health food stores, or organic food markets.  Gluten Free doesn’t have to be organic, but with being a speciality item I’ve found that many times the two can go hand in hand. 


Gluten Free Strawberry Pie

Many times gluten free pies are actually “crustless pies”, but I really wanted to try baking a gluten free crust. Pie just isn’t the same without a crust, and the few desserts my husband actually likes are mostly pies. So I needed to start experimenting with crust recipes before his birthday in October (he absolutely loves pumpkin pie, and I don’t want him to have to miss out because of this new diet!)


Now, unfortunately, our pie was subpar at best. And by that I mean I wouldn’t even eat it, and the guys (we had a friend over for dinner) tried their best to get through it.  We’ll discuss that later. For now, I’ll give you the recipe and add my ideas on how to improve this pie.

The only gluten free all purpose flour I was able to find was organic Buckwheat. Be more than willing to try and make this out of a different GF flour, or use your own wheat flour that you probably already have in your pantry.  The measurements will be the same.  Honestly, I think this is why the pie tasted so horrible.  The crust wasn’t right.  I would suggest trying out either a regular flour,  or testing out a different GF blend.  There are some “pastry” GF flours out there, but our local markets didn’t have any in stock.  Buckwheat is too bitter for pie, and the crust was extremely dark (almost black).  It was also extremely crumbly instead of flaky.  I believe adding a tsp of xanthan gum would have helped.

Ingredients:

½ cup unsalted butter or solid, all vegetable non-dairy shortening
2 to 4 tablespoons cold water (add ice cubes to keep cool)
1¼ cups All Purpose Gluten Free Flour Blend ( plus more for rolling)
1 teaspoon sea salt
2 tablespoons sugar

Directions:

Now for most sorts of cooking, directions and measurements are sort of like guidelines.  For baking this is not the case.  You must be very aware and particular about your ingredients and how they are blended.  Pie crusts are flaky in two ways. One, that wonderful flaky, but melt and your mouth goodness we all love, and two, flaky in the sort that you’ll probably have a different amount of water every time.  Watch and pay close attention to your dough.  Be aware that with the humidity fluctuating, so will the amount of water you’ll need.

Cut butter into ½ inch pieces and place it the freezer for 10 minutes.  I generally do this, and then gather, measure, and prep all of my other ingredients and tools.

Using a food processor blend flour, salt, and sugar. Pulse 5 times. Add the butter and pulse 8-10 times, or until mixture resembles a coarse meal with small round pieces of butter (pea size).

With the food processor running, add water 1 tbsp at a time until the mixture just starts to clump.  If you are able to pinch some of the dough together, and it holds then you have enough water.  You do not need to add more. The dough will still look and feel very crumbly.  

I’ll share a little trick with you on this next part. Since the dough will be crumbly, add it to a large ziploc bag. Put your hands inside the bag, and start forming the dough into a disc. Close the bag, and put into the fridge. Let it sit for at least one hour, but the dough should keep to up to 3 days if you need to make your crust ahead of schedule.   

Time to roll it out!.  Remove the dough and let it sit for 5 minutes before beginning this process.  While the dough sits, gather 2 large pieces of wax paper, your GF flour, and your rolling pin.  Spread flour over the first sheet of wax paper. Add dough.  Sprinkle more flour on the top of the dough, and cover with second sheet of wax paper.   Roll the dough into a circle that is approximately 12 inches in diameter. Its okay if pieces break off. Just pinch them back on!

Remove the top sheet of wax paper, and carefully transfer to a 9 inch pie plate. Push dough gently so that it reaches and lines the sides of your pie plate.   You’re welcome to try and do a decorative finish to the ends of your pie crust.  I opted out of that this go around.

Pre-baking your Pie Crust:

Freeze your pie crust and pie plate for at least 30 minutes

Preheat oven to 350

Foil the entire pie plate.  I personally do not own pie weights, but died beans or rice work wonderfully.  Place the dried beans on top of the foil, and pop all of it in the oven.  Bake for 20 minutes. Remove weights and foil, poke generously with a form, and return to oven (no foil!) for 10 minutes.

Let the pie crust cool completely, before filling.

Ingredients for Strawberry Pie filling:

2 quarts of strawberries, sliced
1 cup water
3/4 cup sugar
1 Tbs corn starch

Directions

Fill your pre-baked pie shell with berries until no more will fit.  Chill for at least one hour.  

Near the end of your chilling time, take the remaining strawberry slices and place in a medium saucepan with 1 cup water.  Simmer until berries are tender. Pour strawberries and water in a food processor (or blender) and puree. After straining, pour mixture back into the saucepan.  Add sugar and cornstarch. Cook and stir on low until the sugar and starch dissolve.  

Pour the hot glaze over chilled berries and crust. Refrigerate and serve. (Add a dollop of cool whip if you so please.  I did!)


See how it just fell apart?

Now here is where I add my suggestions to this Pie filling recipe.  I actually called my mom before baking this pie and went over the recipe with her.  I explained that the recipe didn’t have much substance, and that I was scared it wouldn’t congeal.  1 tbsp of cornstarch isn’t much when it comes to trying to make a pie stick together (especially when the original recipe only calls for chilling, and not freezing.  Which by the way, it didn’t even freeze over after a few hours).  I would suggest adding a block of plain cream cheese in the food processor with the strawberries,  This would give it something to congeal.  Other alternatives would be corn syrup, or even gelatin.  I’ve heard that some folks put their favourite lemon-lime soda in Strawberry Pie. That would probably would well if you were trying to freeze the pie.  

Either way, this pie recipe and crust (with this specific flour) is a thumbs down.  Matt and our friend Austin attempted to give the dessert a second try by something they labeled “The Redemption Smoothie”.  The majority of the pie went into our food processor with some ice and cool whip.  Remember how I said the crust was too crumbly?  Well, that didn’t help much with the smoothie.  Actually, it probably made it worse.  But they were troopers anyway :-)


Good try guys. Too bad the crust kept clogging the straws!


(Thanks so much to Brit for helping me out this week! She's a great cook, and I've had her parmesan encrusted steak, it's amazing! Definitely try it sometime guys!)